
How to Record Microsoft Teams Easily & Free
Microsoft Teams is one of the leading platforms for virtual meetings, and it's easy to see why with its quality features. If Teams is your go-to, you need to know how to record your meetings efficiently so you don't lose any critical information. This blog will teach you everything you need to know.

Recording meetings in Microsoft Teams is something that you simply must know how to do if you are a frequent Teams-er. In the current day and age, with the amount of video conferencing that is happening, we cannot afford to miss important information or blame our depleted post-meeting knowledge on the tools we are using (or perhaps, not using).
We are here today to make sure that, from this very point onwards, you capture all of the important details of your Teams meetings for future reference. Why is this important? Well, we are not superhuman, and it is normal to not retain all of the information fully, especially when the same subject of conversation spans multiple follow-up meetings. With this guide, you will know how to have a constant memory bank that will allow you to prepare fully for any meeting or follow-up discussion.
How to Record Microsoft Teams Meetings
Recording with Microsoft Teams' Built-In Feature
This is a possibility and an option, but it’s not one I would recommend. The reason is twofold. Meeting security lacks slightly with Teams, as you can read about in our full meeting security guide. Essentially, the calls are not end-to-end encrypted and cannot be password-secured for authorized access. Secondly, only one person can record at a time (without shared notes) and the recording will expire after a set period determined by your admin.
If you are wanting to use Teams’ in-built recording feature, then we have included a walkthrough on exactly how to below. For now, let’s get into our main recommendation for how to record Microsoft Teams, Bubbles.
Recording with Bubbles Notetaker
As I say, Microsoft Teams offer some robust recording features, but there are many limitations that Bubbles can address. Here’s how to use Bubbles to record your Teams meetings:
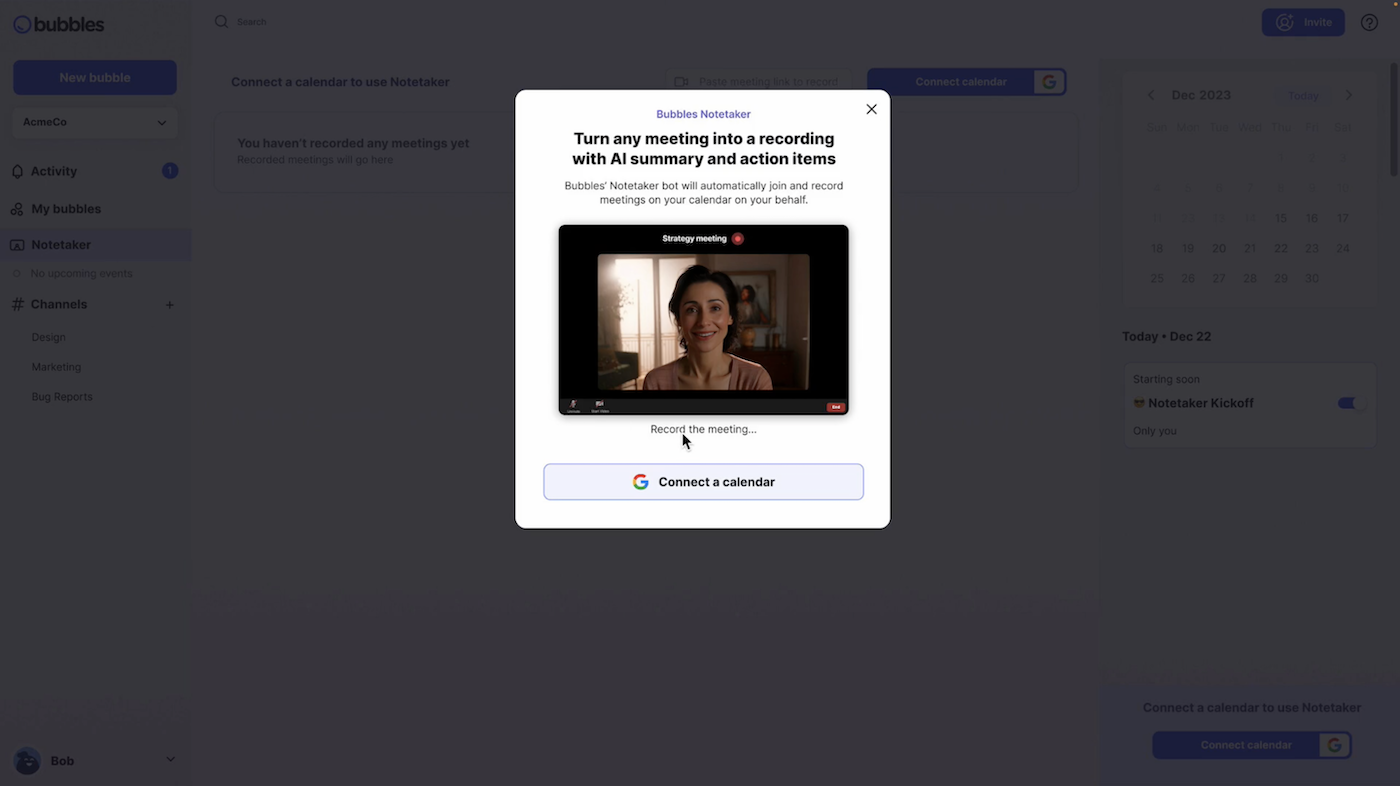
Step 1: Sign up (for free) and create a Bubbles workspace where your team can store and manage recordings. In this step, you can customize workspaces for specific tasks, projects, or discussions. Another option is to install the Bubbles Chrome/Edge extension from the Chrome/Edge Web Store, and get started this way (still free).
Step 2: Connect your calendar to Bubbles so that your upcoming meetings on Microsoft Teams sync with Bubbles Notetaker, allowing the Notetaker to join automatically and get to work quietly.
Step 3: Proceed as usual and set-up your Teams meeting. Events in your Teams calendar (as shown below) will automatically show on the right hand side of your Bubbles “Live meetings” area, where you will see that the Notetaker is set to join and record for you.
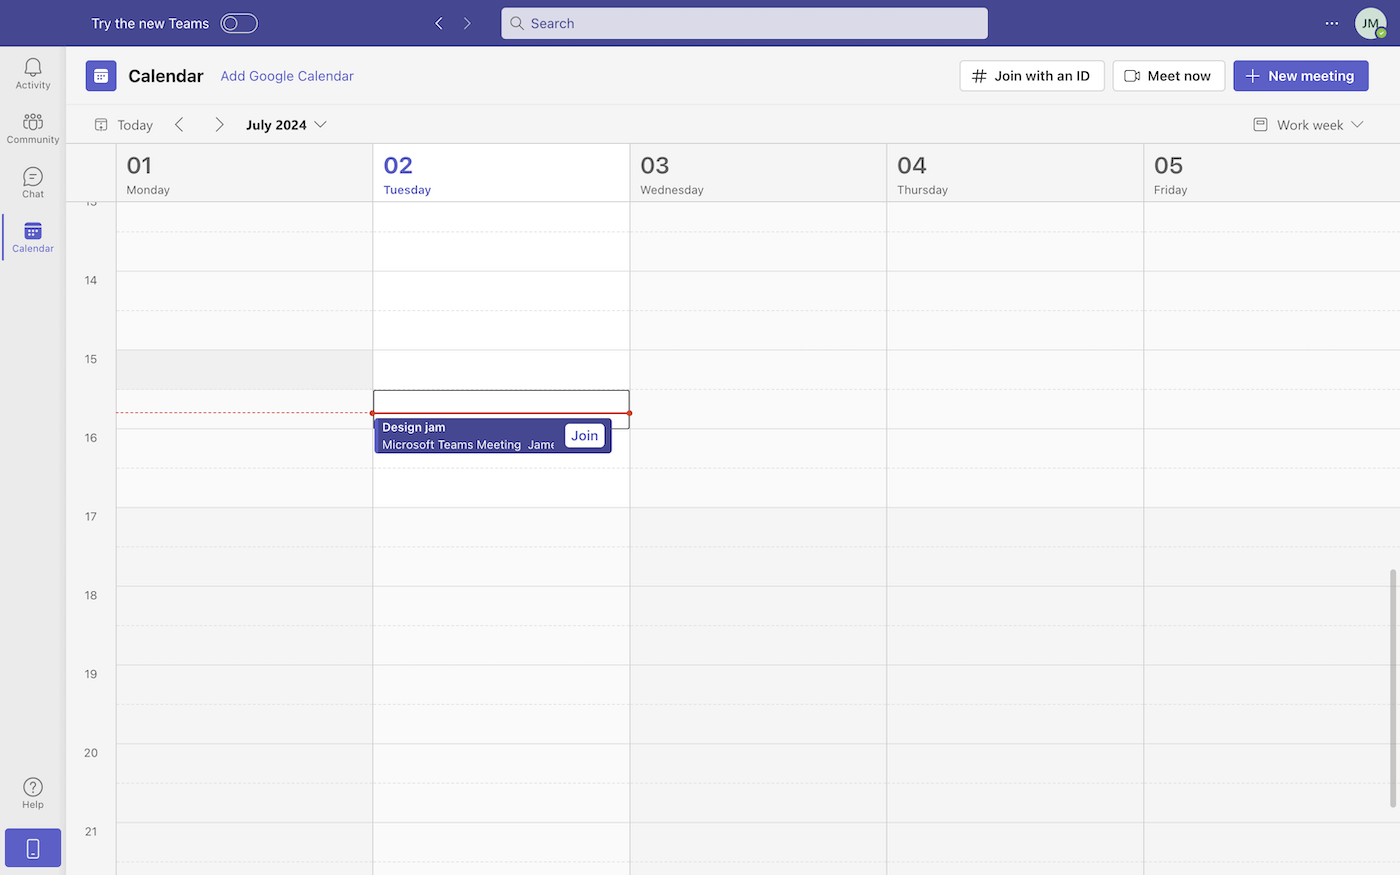
A side note here - you can customize your recording settings in Bubbles to determine and select which meetings you want your Notetaker to join automatically. As an example, if you don’t want Bubbles in your client meetings, then you can easily have your wish granted.
Step 4: Join your Teams meeting, either through Teams itself, or through Bubbles. Your Bubbles Notetaker will automatically join and begin recording and transcribing the meeting, making sure you are covered right from the start. If you are interested in how this looks, then check out the example below from my very own Microsoft Teams meeting.
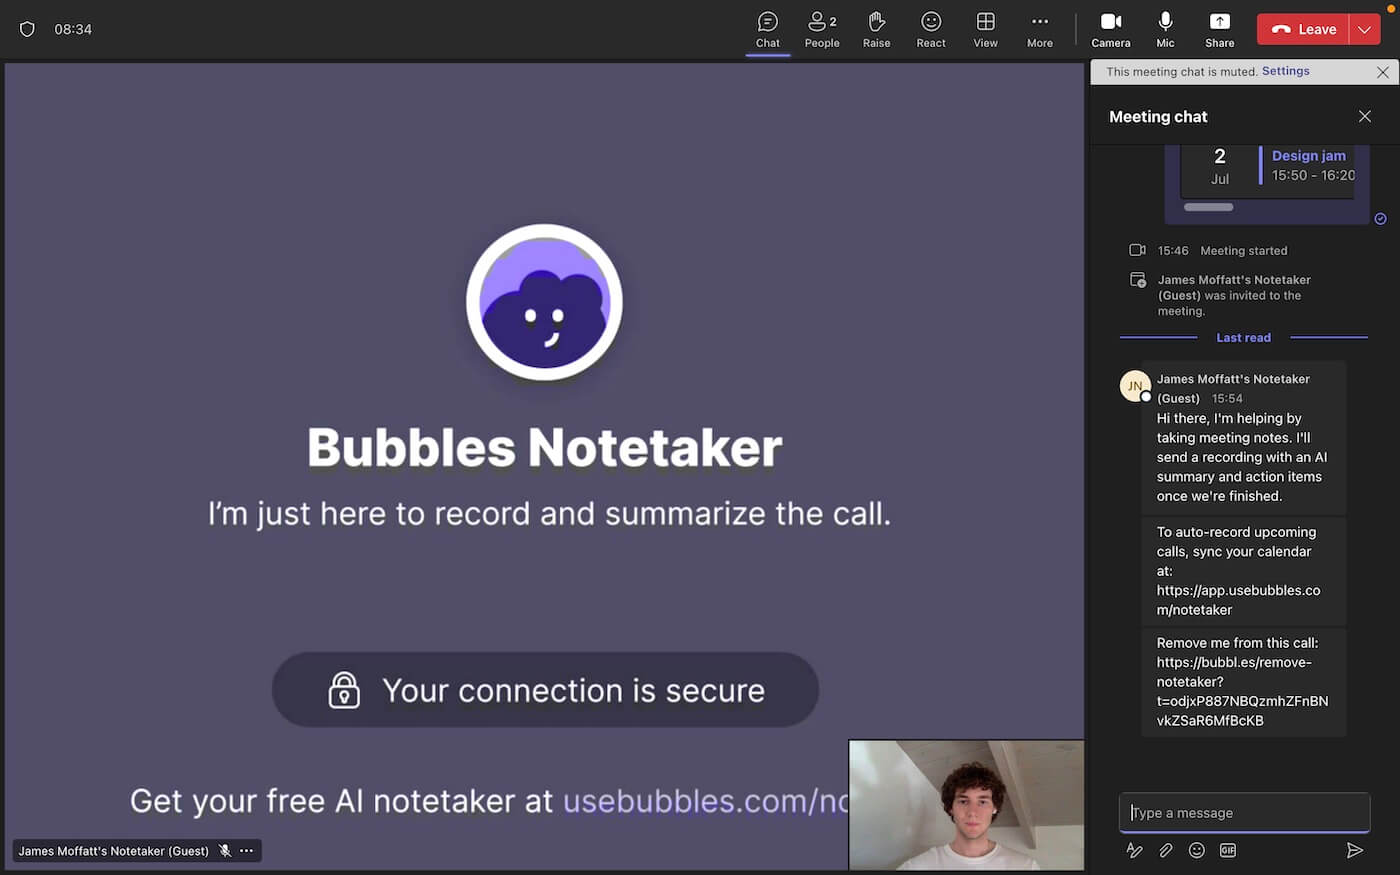
As you can see on the right, your Bubbles Notetaker will also let every attendee know who it is, and what it’s there to do.
Make your
meetings matter
Loved and trusted by 100,000+ users:
- Automatically Record and Transcribe Meetings
- Extremely Accurate Notes, Summaries, and Action Items powered by AI
- Works with Zoom, Google Meet, and Microsoft Teams
- Save time and follow-up with quick async videos
Simply connect your work Google or Microsoft Calendar to get started.

Step 5: Finish your Teams meeting and receive your Bubble recording. This is where Bubbles really stands out, as you can see below. Your meeting recording will appear in your Notetaker area within Bubbles, but the recording link, along with a summary, action items, and more, will also be distributed to all attendees as an automatic post-meeting recap email.

Simply find your most recent Teams meeting recording in your Bubbles channel and enter into it. From here, you can rewatch the meeting and view the transcript. Invite unlimited teammates to comment and provide feedback.
Your Microsoft Teams bubbles are able to be downloaded, which is an extra benefit. Bubbles also have useful integrations with many of the popular project management tools, such as Notion, meaning you can drop your recording anywhere you want.
So, that was our main recommendation for recording Microsoft Teams meetings. However, as promised, we also want to explain how you can Teams' in-built meeting recorder.
Steps to Record a Meeting with Microsoft Teams' Recorder
- Start or Join a Meeting:
- Open Microsoft Teams and join or start the meeting you want to record.
- Initiate Recording:
- In the meeting controls, click on the "More options" button (three dots) and select "Start recording and transcription." All participants will be notified that the recording and transcription have started.
- Stop Recording:
- To stop recording, go back to "More options" and select "Stop recording and transcription." The recording continues even if the person who started it leaves the meeting and stops automatically once all participants leave.
- Access the Recording:
- After the meeting, the recording is processed and saved in the meeting organizer’s OneDrive for Business or SharePoint. The recording link will also appear in the meeting chat or channel conversation.
Important Notes:
- Only one person can record at a time. This can be tedious for post-meeting communication and requires manual sharing.
- Meeting recordings do not capture whiteboards, annotations, or shared notes.
- The recording will expire after a set period determined by your admin.
Sources:
3 Advantages of Using Bubbles Instead:
- Detailed Transcriptions: Bubbles provides more detailed and accurate transcriptions compared to Teams’ built-in feature.
- Highlight Features: Easily mark important moments during the meeting for the Notetaker to pick-up, creating an easy reference for later.
- Enhanced Sharing Options: Share recordings and transcriptions effortlessly with team members who couldn’t attend the meeting, making sure that nobody misses out.
Using our recommendations, you will make sure your Microsoft Teams are thoroughly recorded and documented, regardless of whether you want to keep a performance review record, or whether you simply want a record of a discussion for later. Remember, Bubbles is free to try today.
Collaborate better with your team
Get your point across using screen, video, and audio messages. Bubbles is free, and offers unlimited recordings with a click of a button.
.png)


Collaborate better with your team
Get your point across using screen, video, and audio messages. Bubbles is free, and offers unlimited recordings with a click of a button.

