
How to Record GoTo Meeting (Easy & Free Methods)
If GoTo is your go-to, then you need to know exactly how you should be recording your meetings. With this guide, you can wave goodbye to forgotten action items and missed insights and really take control of your GoTo meetings.

Recording meetings has become a highly normal part of everyday life in our current business landscape. In fact, the world of remote work means that having a good way to record your meetings has actually become part of virtual meeting etiquette. Whether that is for training, documentation, or just ensuring that no detail is missed, the ability to record meetings has grown into an essential feature for professionals.
GoTo: A Widely Trusted Tool for Virtual Meetings
Although holding a smaller market share, GoTo is still one of the most widely used platforms for virtual meetings, offering a seamless experience for teams, educators, and businesses alike. What’s also worth mentioning is that as of June 2023, the web conferencing platform has recorded a yearly revenue increase of $536,833 since its inception. That’s plenty more people who need to learn how to record their meetings properly.
So, why do they need to learn this? Well, that’s because no matter how focused your attendees may be, there are always times when participants miss out on crucial details. That's where recording comes in. Recording meetings allows you to revisit key points, share the discussion with those who couldn’t attend, and ensure all action items and decisions are properly documented.
Recording GoTo Meetings can be achieved in multiple ways, either using GoTo's built-in features or external tools like Bubbles, which offer additional functionality like note-taking, highlights, and faster retrieval of important sections. That is where we will start today.
How to Record a GoTo Meeting on Desktop
So, as mentioned, we are starting this guide by giving you a walkthrough of how to record a GoTo meeting using Bubbles. Bubbles is a third-party tool that can seamlessly integrate with GoTo in order to record, transcribe and summarize your meetings. There are plenty of perks to using Bubbles, and we will come onto a few more of those as we go through the steps below. Here is how you can get started:
1. Download the Bubbles Chrome Extension
I wasn’t lying when I said this was easy and free! Bubbles offer a Chrome/Edge extension that you are able to simply paste your meeting link into and have their Notetaker join that meeting and begin recording. Once downloaded, you will see your new Bubbles extension on your Chrome Extensions Toolbar.

2. Paste GoTo Meeting Invite Link
Now, open your Bubbles Chrome extension and paste your meeting link into it. Notetaker will prepare to join (takes a few seconds) and you will then get a message saying “Notetaker joined successfully”.
Hold your GoTo Meeting Normally
As shown below, you will now be accompanied by Bubbles Notetaker in your GoTo meeting. From here you can continue as normal, and have full peace of mind that every detail in the meeting is going to be captured. FYI, you are able to remove the Bubbles branding from your meetings by upgrading to Bubbles Pro - check the pricing here. Anyway, branding or not, Bubbles will be getting to work by now, recording, transcribing and automatically detecting action items and key points to include in your meeting recap and summary.

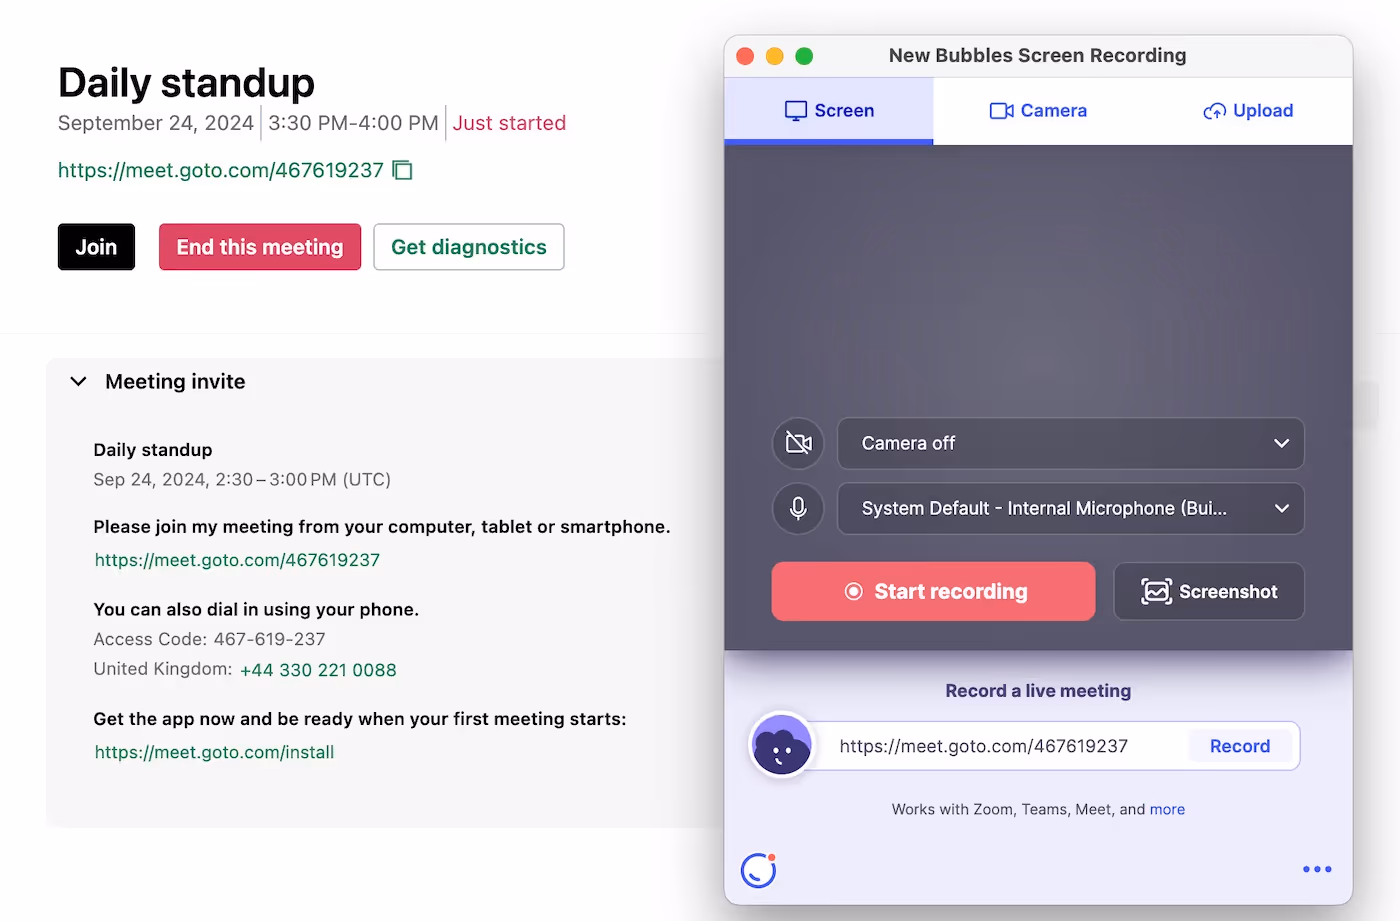
Receive GoTo Meeting Recording
Once your discussion draws to a close, you can end the meeting as normal. Bubbles will also leave when the meeting is over, and will then send you a follow-up email with your meeting’s title, summary, action items for each participant and a link to your recording. You can either click the link here to access your GoTo Meeting recording, or you can find it in your Notetaker area on the Bubbles app itself. Whichever method you use to reach your recording, this is how it will look:
Make your
meetings matter
Loved and trusted by 100,000+ users:
- Automatically Record and Transcribe Meetings
- Extremely Accurate Notes, Summaries, and Action Items powered by AI
- Works with Zoom, Google Meet, and Microsoft Teams
- Save time and follow-up with quick async videos
Simply connect your work Google or Microsoft Calendar to get started.

How to Record a GoTo Meeting Using GoTo’s Built-In Feature
If you prefer to use GoTo's own recording tool, here’s how you can do it using their built-in feature. This method is suitable for those who already use GoTo regularly and want a quick and easy way to record their meetings directly within the platform.
Step-by-Step Guide to Record a GoTo Meeting
- Start or Join a Meeting:
Begin by either scheduling or joining a meeting on GoTo. The recording feature is available both when hosting and attending, provided that the necessary permissions are in place. - Enable Recording: Once the meeting starts, you will see the option to record your session on the control panel.some text
- On the desktop app, simply click the “Record” button located in the control bar at the top of the meeting window.
- If you're hosting from a web browser, look for the same “Record” option in the meeting toolbar.
- Pause and Resume Recordings: During the meeting, you might want to pause the recording. This can be done at any time by clicking the “Record” button again, and you can resume by pressing “Record” again. This is useful when off-topic conversations occur, and you don’t want to include them in the final recording.
- Stop Recording:
When your meeting ends or you no longer need to record, simply press the “Stop” button on the recording panel. This ensures your recording will save and be processed. - Access Your Recordings:
After the meeting ends, you'll be directed back to GoTo, where the recording will be available (it might take a few minutes for the file to show up). If you opted for local recording, navigate to the folder you selected for saving your recordings.
Note: All local recordings are stored in WEBM format.
- Share and Download:
You can share your recording with participants or other colleagues by using GoTo’s shareable link feature. You can also download the recording to your local device if you wish to edit or archive it externally. Remember, though, this is just a recording. For more advanced collaboration features, we recommend using a third-party AI note taker tool.
Frequently Asked Questions About Recording GoTo Meetings
Here are some common questions and answers related to recording meetings on GoTo in case you haven’t got a full grasp from the information above.
1. How long can I record a meeting on GoTo?
The maximum length for a GoTo Meeting recording is 8 hours or 20 GB, whichever comes first. Be mindful of these limits, especially for longer meetings, as recordings will automatically stop once either of these thresholds is reached.
2. Can I record a GoTo meeting on mobile?
Yes, GoTo allows you to record meetings from its mobile app as well, but make sure that you have enough storage on your device, as recordings from mobile can take up significant space.
3. Can participants record a GoTo meeting?
Only the host and those granted permission by the host can record a GoTo meeting. To record a GoTo meeting, a GoTo Meeting Pro or Plus tier account is required or you will need an account admin to activate the Cloud recording feature.
4. Where are my GoTo recordings stored?
Your GoTo recordings are saved either locally on your device or in the GoTo cloud, depending on your account settings. You can always access and manage them from the Meetings tab on your dashboard.
Why Should You Record Your Meetings?
And finally, we want to just clarify why exactly you should be bothering with all of this (easy as it is). For us, recording meetings isn’t just about documentation. Actually, there are several benefits to recording GoTo meetings and virtual meetings in general:
- Better Focus: Participants can fully engage in the conversation without worrying about note-taking.
- Reference for Future Decisions: Recorded meetings serve as a reference, so that you can make sure nothing is lost in translation when decisions are made later. There will be no Telephone Game with your GoTo meetings if they’re recorded properly!
- Share with Absentees: If someone is unable to attend, the recording ensures they can still stay in the loop.
- Training and Onboarding: Recorded meetings can be used as valuable training materials when it comes to the employee onboarding process.
- Review and Analyze: Post-meeting, recordings allow you to review the discussion, spot trends, and refine future strategies based on insights.
Anyway, now that that is established, you can rest assured that you know how and why to record your GoTo Meetings. By following these methods, you can make sure that every important detail from your meetings is preserved, whether you're using Bubbles for a more enhanced experience or GoTo's own recording features for straightforward documentation.
Collaborate better with your team
Get your point across using screen, video, and audio messages. Bubbles is free, and offers unlimited recordings with a click of a button.
.avif)


Collaborate better with your team
Get your point across using screen, video, and audio messages. Bubbles is free, and offers unlimited recordings with a click of a button.
.avif)