.jpg)
How to Share Screen on Google Meet: Quick Guide (All Devices)
Learn how to present better with our guide on sharing screen on Google Meet.
Screen sharing on the ever-popular Google Meet is something you definitely want to know how to do, and in my eyes, is an essential feature for presentations, collaboration, and teaching.
This guide will help you learn the ropes, walking you through how to share your screen on Google Meet. We have covered all devices and provided tips for troubleshooting and maximizing efficiency, so we can almost guarantee you’ll be an expert once you’re done here.
What Is Screen Sharing in Google Meet?
Screen sharing lets you present your entire screen, a single window, or a specific tab during a Google Meet session. You can share documents, slides, videos, data, etc with participants or colleagues. As well as that, Google Meet supports sharing audio from your presentations when using Chrome tabs.
How to Share Screen on Google Meet by Device
For Desktop (Windows, macOS, Linux, ChromeOS)
- Open Google Meet: Visit the Google Meet website and click to join or start a new meeting – so basically, do as you would normally.
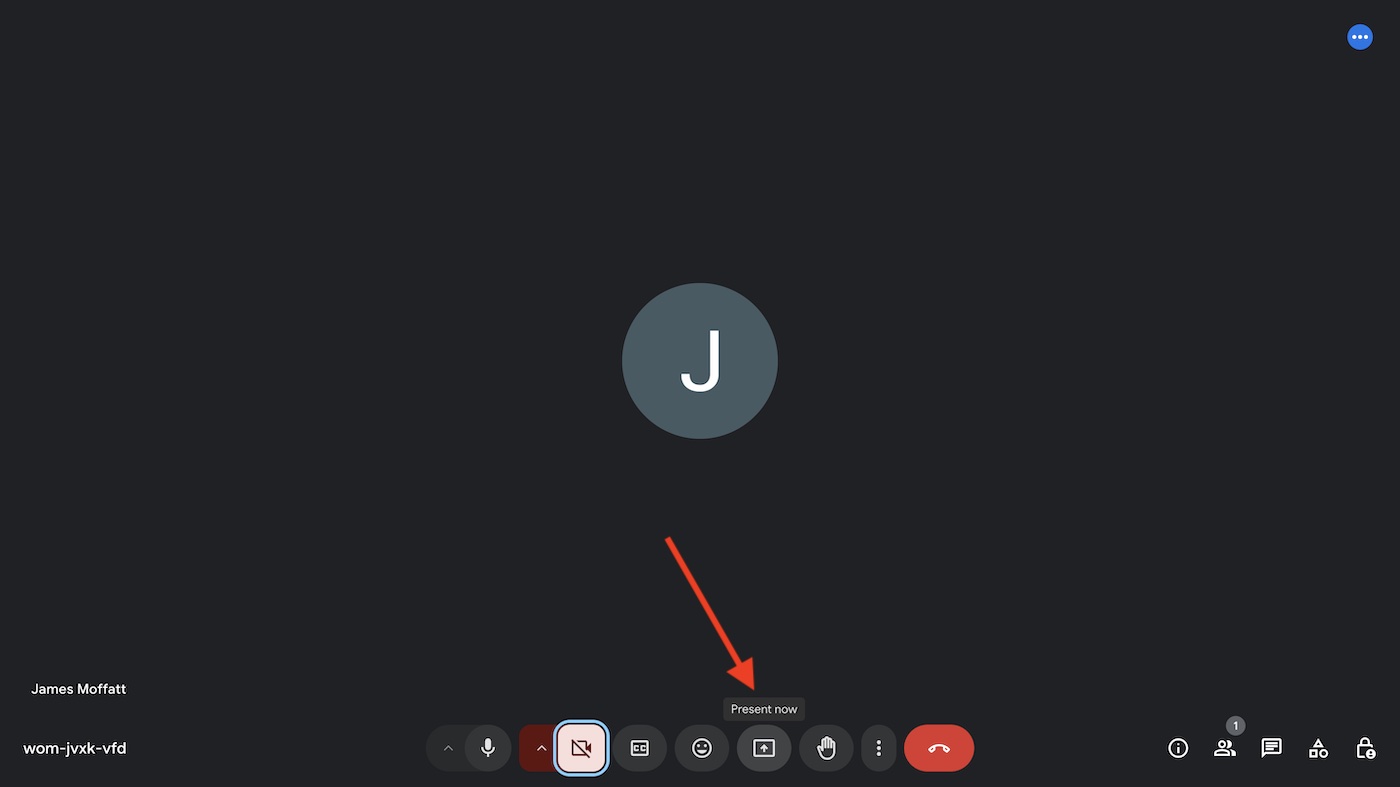
- Choose Present Option: You should see that on the meeting toolbar, there is an icon for Present Now. This is what will enable you to proceed to sharing your screen, so click this (shown below).
- Select What to Share: You’re going to see three options here. Now, you just need to choose whichever option works for your screen sharing needs, or whichever you would prefer to share. The three options will be:some text
- Your Entire Screen: Shares everything visible on your desktop.
- A Window: Shares a single app window.
- A Tab: Best for sharing content with audio (e.g., videos, animations).
- Confirm Sharing: Click the appropriate tab/window/screen, then click Share.
Stop Sharing:
- Click Stop Sharing in the toolbar or the "You are presenting" banner in the bottom right followed by clicking Stop presenting.
Tip:
- If you also want to share your audio, then you have to select the option for sharing A Tab and share your Chrome tab.
Make your
meetings matter
Loved and trusted by 100,000+ users:
- Automatically Record and Transcribe Meetings
- Extremely Accurate Notes, Summaries, and Action Items powered by AI
- Works with Zoom, Google Meet, and Microsoft Teams
- Save time and follow-up with quick async videos
Simply connect your work Google or Microsoft Calendar to get started.
For Android Devices
To Share Your Screen:
- Open Google Meet App: Download and open the Google Meet app from the Play Store.
- Join a Meeting: Select a scheduled meeting, enter a meeting code, or start a new meeting.
- Tap More Options: Tap the three-dot menu in the bottom-right corner.
- Select Share Screen: Tap Share Screen which will be shown on the popup, then click Start Sharing. Your mobile screen will now be visible to participants.
- Sharing Audio: Make sure to click the checkbox on the “Present to everyone” popup if you want to share your audio too. FYI, this is not available on all devices and only available on the Google Meet app.
Stop Sharing:
- Return to the Google Meet app.
- Tap Stop Sharing, followed by Ok.
For iPhone and iPad
To Share Your Screen:
- Open Google Meet App: Install from the App Store and sign in.
- Join a Meeting: Choose an ongoing meeting or enter a code.
- Tap More Options: In the bottom-right corner, tap the three-dot menu.
- Select Share Screen: Tap Share Screen.
- Start Broadcast: Now, you need to confirm the screen sharing by tapping Start Broadcast. Your screen is now visible to everyone in the meeting.
During the Presentation:
- Navigate your screen to show desired files or apps.
- For audio, ensure your microphone is unmuted.
Stop Sharing:
- Open Google Meet.
- Tap the Stop Broadcast button.
Join Google Meet Only to Present
This is possible and will result in only your window/app being shown in the Meet meeting, rather than the normal audio/video.
- Open Google Meet App: Open the Meet app on your mobile device and tap on an upcoming meeting.
- Instead of tapping Join as your normally would, tap Share Screen.
- Tap continue in the window: “About screen sharing”.
- In the meeting, tap Start Now and you will begin to present.
Sharing Specific Content
Sharing a Google Chrome Tab with Audio
- Click Present Now > A Chrome Tab.
- Select the tab you want to share.
- Audio will be shared by default if you are sharing a Chrome tab.
- To switch tabs, click Share this Tab Instead from the banner.
Sharing Google Docs, Slides, or Sheets
Google Docs, Slides, and Sheets can be shared as you are presenting in Google Meet, but the share suggestion will only appear if you are on Chrome or Edge and not using Incognito mode:
- Open your file.
- Click Present a tab as the sharing mode.
- Now, you will be able to grant access to the file or even attach it to the meeting event in your calendar.
- Your file is now visible to participants who will receive a notification that you shared it.
Troubleshooting Screen Sharing Issues
Why Can’t I Share My Screen?
- Admin Restrictions: Host controls or admin policies may block sharing.
- Unsupported Browser: Use updated versions of Chrome, Firefox, or Edge.
- Hardware Limitations: Make sure that your device supports screen sharing.
Participants Can’t See My Screen Clearly
- Improve Internet Connection: Switch to a stronger network as the screen sharing may be overwhelming your connection.
- Adjust Sharing Settings: If you share only the window or tab, then you can reduce bandwidth usage and improve the picture.
Pro Tips for Great Screen Sharing
- Prepare in Advance: Close irrelevant tabs or apps to avoid distractions or to avoid showing something personal.
- Mute Notifications: Turn on Do Not Disturb mode during the meeting in case you get bombarded with messages mid-presentation.
- Enable Hardware Acceleration: For Chrome, go to Settings > System > Use hardware acceleration when available and restart your browser.
Elevate Meetings with AI-Powered Notes
While sharing your screen helps improve collaboration, it is also essential to capture this improved collaboration effectively. Bubbles, an AI-powered meeting assistant, can help record, transcribe, and summarize your Google Meet sessions.
How to Use Bubbles with Google Meet:
- Sign Up for Bubbles: Go to the Bubbles app and create a free account. Connect your calendar for automatic meeting integration. Another option is to download the Bubbles Chrome/Edge extension.
- Invite Bubbles: Bubbles will join automatically if you connect your calendar. If not, then invite Bubbles through the extension/app so that the Notetaker can join and take notes instantly.
- Receive Summary and Action Items: After the meeting, Bubbles will send you a follow-up email. In the email, you’ll find a detailed summary and personalized action items, alongside a link to a full recording and transcript.
By mastering Google Meet’s screen-sharing tools and integrating AI-powered assistants like Bubbles, you can change the way you meet with your team and increase the efficiency of your collaboration and communication. Happy presenting!
Collaborate better with your team
Get your point across using screen, video, and audio messages. Bubbles is free, and offers unlimited recordings with a click of a button.
.png)
Collaborate better with your team
Get your point across using screen, video, and audio messages. Bubbles is free, and offers unlimited recordings with a click of a button.
.png)


.webp)
