
How to Transcribe an Interview Automatically + for Free
If you're conducting or partaking in interviews and want to ensure you capture every detail, knowing how to transcribe them automatically is essential. Today, we'll guide you through exactly how to do this.

Elon Musk famously believes that if you want to do something to your full potential, you need to have your full focus on that one thing. This translates well to what we are trying to achieve here today. In an interview, regardless of whether you are the interviewer or the interviewee, your full attention must be on the other person, and the discussion at hand.
So, how do we achieve this? Clearly, there is a need for keeping notes during interviews, especially if you are having multiple interviews and have a tendency to forget information (as we all naturally do). However, taking these notes manually is so last decade. When work culture shifted more towards remote work, we not only witnessed a change in interview style, with online meeting platforms like Zoom being used, but we also opened the door to being able to easily record and transcribe interviews.
This shift means you are able to keep your eyes off of a sheet of paper, and on the other person in the interview, without losing any details for your post-interview analysis and review. You also save yourself time. Below, we will show you how to achieve this in your next interview, with a quick step-by-step guide on how to transcribe an interview quickly, automatically, and free of charge.
How to Transcribe an Interview
Essentially, you have two options. You either pay for a manual transcription of your interview, where a human will listen to the interview, transcribing it in full or jotting down notes, or you automate the transcription process. Personally, I have found that the first option takes excessive time and costs over the odds, while automating a Zoom transcription, for example, is highly cost effective while retaining the accuracy.
For these reasons, I want the latter to be the process that I show you in my step-by-step guide. Let’s get started.
This is a four-step process, with the fourth step being you accessing your transcription. As I mentioned, this is going to be super easy for you.
Step 1: Sign Up for Bubbles
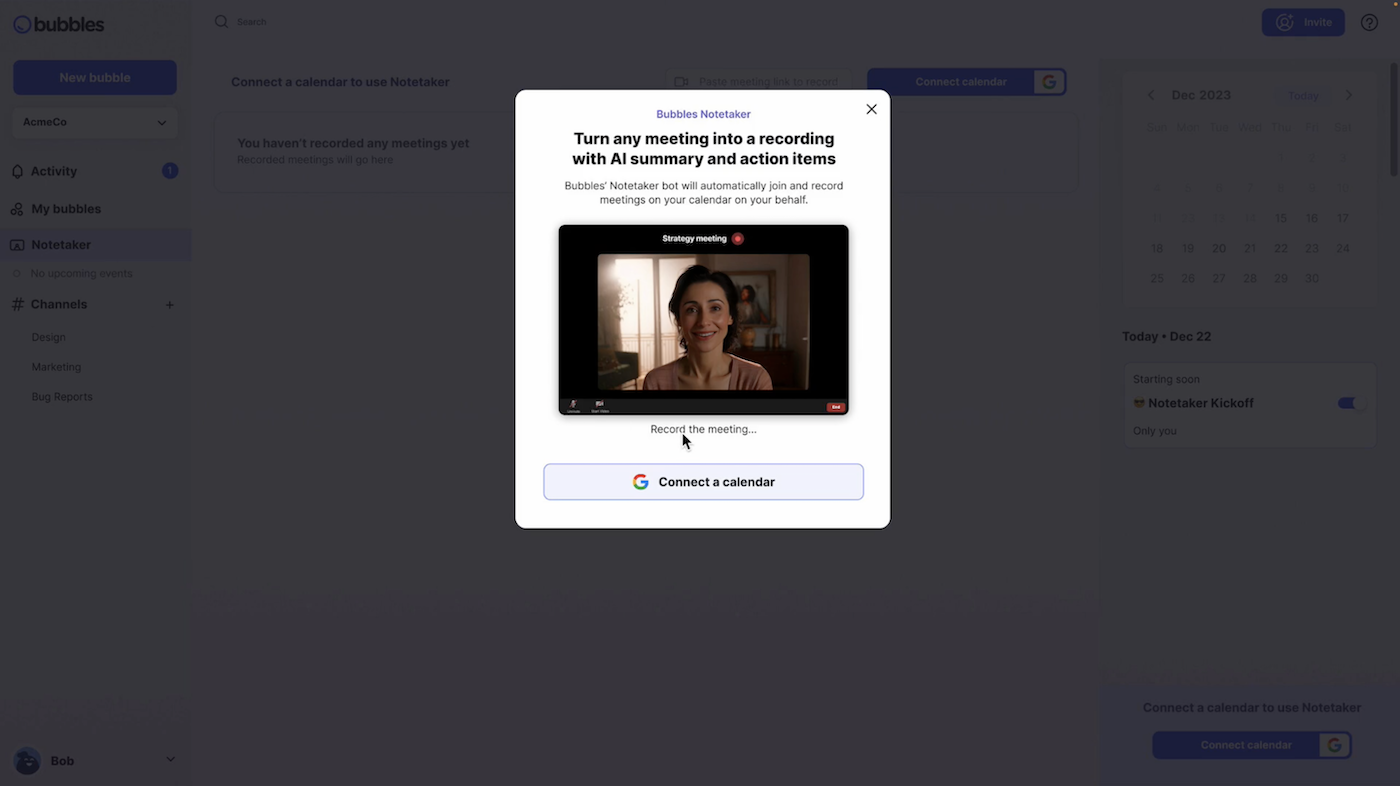
Head over to the Bubbles app and follow the steps to create a free account. This will provide access to their awesome notetaker and transcription features. In the sign-up flow, you will be prompted to set up a Bubbles workspace and link your work calendar. By linking your calendar, Bubbles will automatically sync to your schedule, joining interviews and transcribing them without you needing to instruct it to. Keep in mind, you can also personalize your settings to choose which interviews Bubbles joins. This is how this will look when you sign-up:
Make your
meetings matter
Loved and trusted by 100,000+ users:
- Automatically Record and Transcribe Meetings
- Extremely Accurate Notes, Summaries, and Action Items powered by AI
- Works with Zoom, Google Meet, and Microsoft Teams
- Save time and follow-up with quick async videos
Simply connect your work Google or Microsoft Calendar to get started.

Step 2: Schedule Your Interview
If you have connected your calendar already, then you can carry this step out as you normally would. When you schedule an interview in your calendar, it will automatically sync to Bubbles, appearing on the right-hand side of your Notetaker area. You can see this in the image above, where the example “Notetaker Kickoff” meeting plays the part of your next interview.
Additionally, you are able to paste the meeting link of your interview into your Notetaker area (at the top), and it will then automatically join and get to work. However, always try to connect your calendar, as this is easier and will save time.
Step 3: Start or Join the Interview
As soon as you start or join the scheduled interview, Bubbles will automatically join alongside and begin to record and transcribe the interview, regardless of which meeting platform you are using. In our example below, we have set up a mock interview in Zoom, so that you are able to see how your interview will interact with Bubbles.

Bubbles keeps quiet and does its work in the shadows, except for when it sends a message in the chat at the start of the interview to inform all attendees that it is here to help the user by recording and transcribing. Something to note is that Bubbles offer a Bubbles pro version, where you are able to remove all of the Bubbles branding seen below from your interviews. This is ideal if you want to keep more of a low-profile, and is still quite cost effective. However, Bubbles’ normal version is free.
Step 4: Access Your Interview Transcription
It’s now time to enjoy the fruits of your labor (which has been significantly reduced!)
After the interview draws to a close, Bubbles will process the full recording and get to work transcribing it instantly. You will receive a follow-up email from Bubbles, which will contain a link to your interview recording, automatically generated action items for each member of the interview (if applicable), and a summary so that you can have a quick meeting recap of your interview.
You will also be able to access your interview transcript and recording in your Bubbles Notetaker area. There is no difference between accessing the transcript via the email and via the Notetaker area. This is how your transcript will look once you do access it:
If you read the transcript in the example above, you will see what I mean when I say that automating your interview transcription process will retain most (if not all) of the detail.
When testing Bubbles Notetaker, I really enjoyed having the full recording right there alongside the transcript. I found that the additional context that this offers is super helpful for analyzing key parts of the interview.
You might have noticed that there is also a ‘Conversation’ tab next to your transcript. This is where you will find action items, and also where you will be able to keep the conversation going. Use the ‘Conversation’ area to send pinpointed text replies to your recording, or to send a bubble (screen recording) if you need to deliver a larger, more complex point of view or a piece of feedback that might come across better in a video recording. Check out the ‘Conversation’ area below, with example action items:

How to Transcribe an Interview Recording
If you've recorded an interview and need to transcribe it, then we’ve got you covered. Follow these steps:
- Upload the Recording: Sign in to your Bubbles account and start a new bubble recording.
- Select the File: Locate and upload the file of your recorded interview from your device. This will be used to form the content of your new bubble, so that Bubbles can transcribe it. You can simply drag and drop it.
- Process the Transcription: Bubbles will get to work on the interview recording, processing it and creating a complete transcription.
- Review and Share: You can then find the transcription of your interview recording in your “My bubbles” section, ready for you to use however you desire.
Final Thoughts
Interviews are not to be taken lightly. The way that you come across in any interview can be something that influences opinion on you throughout the whole process. Therefore, you should be giving interviews the attention they deserve, starting with you giving your full attention to the other person. By transcribing automatically with Bubbles, you will be one step closer to achieving this goal.
Collaborate better with your team
Get your point across using screen, video, and audio messages. Bubbles is free, and offers unlimited recordings with a click of a button.
.png)


Collaborate better with your team
Get your point across using screen, video, and audio messages. Bubbles is free, and offers unlimited recordings with a click of a button.
.avif)